Practically all the files that can bedownloaded from this site need to be uncompressed with gzip (check the file extension). Two longerfiles have been split. After uncompressing the seperate parts of these files with gzip, you willhave filenames that look likefilename_aa, filename_ab, etc. Merge the serpate filestogether with the command: cat filename_a* > filename |
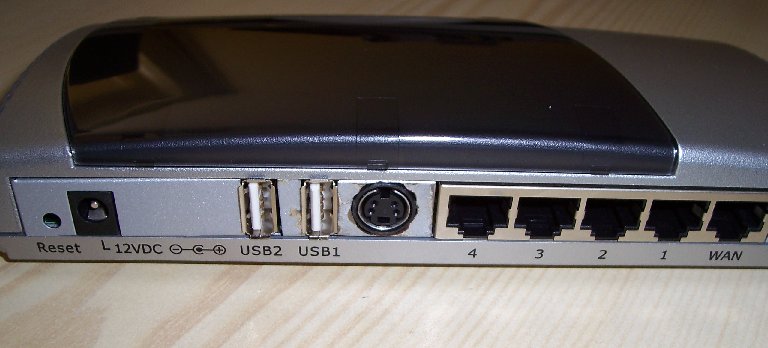
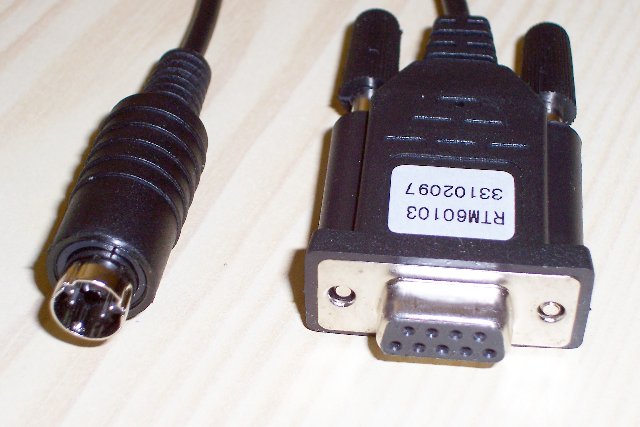
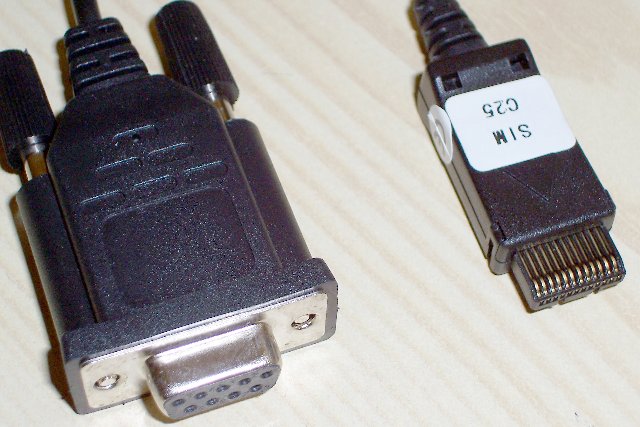
Hackingan Edimax BR6104KP router all starts with creating theneccesary Serial Cable to connect to the router. I bought a cheapSiemens mobile C25 serial connection cable (for a couple of Euro's).This cable is an easy solution to transform the high voltage in/outputlevels of the computer's RS232 port, to the 3.3V levels that the routerrequires. Initially the connectors on the Siemens C25 serial cable look like this: Someone I know, who also hacked into his Edimax, mounted an extra(mini-DIN) connector to the back of the router to connect the serialcable. I think the router looks much less nerdy if there is notcontinuously hanging a cable from it, so I added a mini-DIN connectorplug to my Edimax. The back of my router now looks like: And the serial connector cable looks like: The connections on the router print with the cable I bought are asfollows: 1.RX White 7.TX Blue 8.GND Black More serial cable modding information can be found at: http://www.meshcube.org/meshwiki/ModifiedMobileSerCable |
Thefirst thing I want to try is to get the router to boot from USBstick. I therefor followed the instructions from JeroenDomburg. First I prepared my 256MB USB stick by dividing it into threepartitions. I plug my stick into my PC, and open a Linux command shell.The command mountshows you where the stick is mounted (if your Linux distribution mountsit automatically). In my case it is automatically mounted; the deviceis /dev/sda1. First use the command suto become root in a Linux command window and unmount the memorystick. umount /dev/sda1Then start fdisk, and use the following commands as a guideline toformatting the memory stick: fdisk /dev/sdaNow the usbstick partitions have to be formatted: mke2fs /dev/sda1Now make sure that /dev/sda1is mounted. Then make sure thatyou are rootand change directory to the location where the stick ismounted. In my case: cd /mnt/usbdiskThen untar the rootfs file as created by JeroenDomburg or my snapshotof that file. tar -xjvf ~/MyDownload/rootfs.tar.bz2The memory stick now contains a filesystem which the router can useduring booting. |
Nowthe firmware file has to be uploaded to the Router'sflash. Jeroen Domburg created a ready to use firmware which can befound hereor you can use this snapshot. First I want to understand the contents of the firmware file and testit on the router without running the risk of blocking myself out of therouter completely. I used the package khexedit (which comes with mySuSE distribution) to view and modify the contents of the firmwarefile. I found some information about the structure of the firmware fileat Norocketscience. ================================= I checked the Flash_usbroot-1.0.bin which is 1057507 bytes long. Andthe EdiEngBR6104KP_2.13.bin which is 1892078 bytes long and is aofficial firmware release from Edimax. You don't really need this file,but ifyou want to check it or keep it to be able to restore the originalrouter firmware, it can be found at the Edimaxsite, or here's a snapshot (part1, part2) of thefile.In the text below, the information that comes from Jeroen Domburgsfirmware file is printed in black. If the Edimax firmware differs, thisinformation is printed in gray. The first header is located at 0x00 - 0x0c It starts with WB4K (=6104K firmware) or WBKP (=6104KP firmware) Then: 00 00 01 00 Then: 4 bytes with the length of the file that follows (in this casewebpages-6104kp.bin, as we will see a couple of bytes further) C8 57 01 00 (= 0x0157c8) orED01 00 00 (= 0x01ed) So this file will end on 0x0157c8 + 0x0c = 0x0157d4 or 0x01ed + 0x0c =0x01f9 At location 0x0c-0x0157d4 or0x0c-0x01f9we find a gzipped file. At location 0x0c the header of a gzipcan be identified (I'm not going to describe the gzip format). You cansee the name of the file that is stored in the gzip file: webpages-6104k.bin orwebpages-6104kp.bin Then there's padding of zeros (0x00) until adress 0x20000 or adress 0x10000 CSYS header from 0x20000 - 0x2000c or 0x10000 - 0x1000c Starts with CSYS Then: 00 00 50 80 Then: 4 bytes with the length of the file: vmlinux.bin D7 22 0E 00 (= 0x0e22d7) orE2DE 1B 00 (= 0x1bdee2) This file will end at 0x0e22d7 + 0x2000c = 0x1022e3 or 0x1bdee2+0x1000c = 0x1cdeee If you use the hexeditor to extract the vmlinux.bin from the fileyoucan uncompress it using: cat vmlinux.bin | gzip -d -c > vmlinuxGzipwill give an error message if you have a corrupt gzip file. If all iswell, you should see no error messages and you should have received avmlinux file. Then use: cat vmlinux | gzip -9 -c > vmlinuzYounow have a vmlinuz file which you can test withoption (b) during theboot process of your router. This process is described in the nextsection. The vmlinuz file is basically identical to the vmlinux.bin file, exceptthat the compression level is higher. |
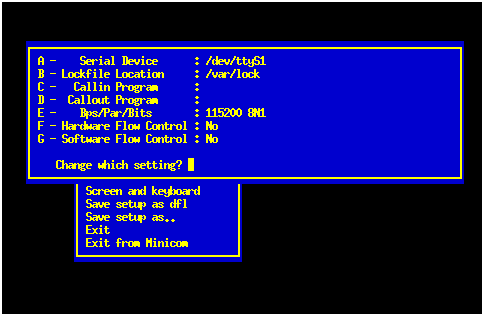
Inorder to test the vmlinuz file, start minicom -o and makesure that the minicom window is active. Now power on your router, and tap the spacebar three times, to enterthe boot menu of the router. you will see the following message: Linux Loader Menu Now the thing that really took me some time to discover, is the factthat option aand option b,do not expect the same type of file. Even though both options suggestthat you need to send a vmlinuz file. Option a however expects afirmware file (must contain a CSYS header), while option b expects acompressed kernel file (vmlinuz). Option b is the safeoption, using this option you should not be able to do permanent damageto your router. I had some problems initiating the filetransfer smoothly, and from somecomments on the net, I noticed that some others had thatproblemalso. In order to start the filetransfer without difficulties I did thefollowing...... Do not choose any of the options in the bootmenu (yet). To start thefile transfer protocol in the minicom window press: Ctrl-A,S Choose xmodem, and select the vmlinuzfile that you want to send (In minicom tap the spacebar twice to changedirectory, tap it once to select a file, and press return to startsending the file). Minicom is now waiting for the modem to startreceiving the file. Now the router needs to receive the command b, to startreceiving the file. I created a tiny binaryfilewith only the ascii character code for b in it. Now to start thetransfer I send the contents of the file to the com port (in mycase ttyS1): cat b.bin > /dev/ttyS1If you look in the minicom window you can see that thetransfer commences nicely. Once the transfer is done, the new kernel will start bootingimmediately. If you stick is plugged into the first usb port of therouter, the whole booting process should run through, and you shouldget a command prompt at the end of the process. If you did not plug inthe usb stick, the process will stop relatively early, and keepsretrying every second to see if the stick is available: request_module[block-major-8]: Root fs not mountedIf you plug inyour stick (into the first USB port), the boot process shouldcontinue. If you do not have a network cable connected to the router,the dhcp process will also get into a loop wating for the DHCP server.Using Ctrl-C you can interrupt this loop, the booting process willcontinue and end up with a command prompt. |
Ifthe test in the previous section went well, you are ready to flashJeroen Domburg's firmware into the router. Start minicom -oand make sure that the minicom window is active. Nowpower on your router, and tap the spacebar three times, to enter theboot menu of the router. You will see the following message: Linux Loader MenuDo not choose any of the options in the bootmenu (yet). To start thefile transfer protocol in the minicom window press: Ctrl-A,S Choose xmodem, and select the flash_usbroot-1.0.binfile. Minicom is now waiting for the modem to startreceiving the file. Now the router needs to receive the command a, to startreceiving the file. I created a tiny binaryfilewith only the ascii character code for a in it. Now to start thetransfer I send the contents of the file to the com port (in mycase ttyS1): cat a.bin > /dev/ttyS1Afer uploading you will see: Linux Loader MenuYou will be back in the Linux Loader Menu. Choose c to start the newkernel. |
OK.Now I understand how it works; flashing a new kernel into therouter, andbooting from usb stick. Now I want to create my own utilities and/orkernel as I see fit. First I tried to use the cross-compiler that Edimax has made availableas Edimax-tools.I was not able to get these tools to work on my SuSE 10.1. In the end Idecided to install an old Linux distribution which uses the same kernelversion as the original Edimax firmware. I chose Mandrake 8.2, whichuses kernel 2.4.18. With this Mandrake version, the Edimax tools, andthe Busybox sources, I was able to build a new Busybox executable forJeroen Domburg's rootfs, which also included vi, and swapon. The sourceis located hereand the result can be found here. The fact that I had to install an old Linux distribution, in order tocompile a new package for my router bothered me (a lot). It must bepossible to compile new packages for my router with my current (andfuture) SuSE versions. After experimenting a lot with adding extraenvironment settings to the makecommand. For example: yes "" | make -j1 CC=/export/tools/bin/mipsel-linux-gcc CROSS=/export/tools/bin/mipsel-linux-I also got my hopes up when I discovered the BuildrootuClibc site. I was not able to get the compilation process to work on mySuSE 10.1 |
Aftera lot of browsing on the internet and almost giving up, I foundthis magnificent Sunspot site. I accurately followed the descriptions, and it all worked like a charm. Here's what I did based on the Sunspot information: I created a folder named Sunspotand copied the files mentioned on the site to that directory. To makesure that all neccesary files remain available, here are snapshots ofthe files I used: configurationfilefor kamikaze, and here is the configurationfile I used for the kernel. If you want touse this file, copy it in the Sunspotdirectory, just like you did withthe other files. When building a package, I always like to log exacly what I do. Anice way to do that, is to use the following two commands when youstartyour work: script make.log1When you are done type: historyAfter you finish your work, you have a log file: make.log1which contains all the terminal in and output information, with at theend a listing of the commands that are logged in the log file. Thisworks fine for me, hope you like it. (Make sure following packages are installed: ncurses, flex, zlib-devel, bison) I put all the abovementioned files in the Sunspot directory and executethe following commands:
An initial root filesystem is located in the directory Sunspot/kamikaze-200602050443/trunk/openwrt/build_mipsel/linux-2.4-adm5120/root/.I copy these files to the usb stick using the following commands (asroot): cd Sunspot/kamikaze-200602050443/trunk/openwrt/build_mipsel/linux-2.4-adm5120/root/If you need the kernel modules, you need to copy them seperately to theusb stick: cp -R Sunspot/kamikaze-200602050443/trunk/openwrt/build_mipsel/linux-2.4-adm5120/modules/lib/modules/2.4.32/kernelAs described above, the vmlinuzfile can be tested with the router, and if it works (together with thememory stick) the midge-ttyS1-96-firmware.binfile can be flashed into the router (make sure your memory stick is inusb port 1). |
Nowthe router boots automatically from usb. If you want to log in for thefirst time as root,use the password: midge. Some of the things I modified on my usb stick:
|